|
|
|
Who's Online
There currently are 6043 guests online. |
|
Categories
|
|
Information
|
|
Featured Product
|
|
|
 |
|
|
There are currently no product reviews.
 ;
Excellent service manual includes everything is need to repair this radio-caseete, how to disassemble, wiring diagram, all , waiting time until the download was only a few hours. I'm going to buy service manuals from here, are cheap and very good.Thank you.
;
Good service manual,i saved from scrapping this deck,is now fully functional.Thanks.
 ;
Found this to be the manual included with the original packinging, was helpfull but did not give any detailed repair instructions.
;
Complete service manual, was very helpful in repairing this tapedeck.Thanks.
;
The service manual was a copy of the original from Wirlpool. The quality was good, all neccecary information was available including the service-codenumbers, so I could order the right part to be replaced for repair.
Downloding was no probem after the payment.
Thanks for the service!
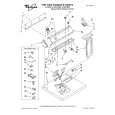
Alignment and Adjustment
b-2. Press �ENTER(CONFIRM)� button so that the white vector moves to the center on screen of the vectorscope. b-3. Store the data to mode 0A2, 0A3, 0A4 and 0A5. b-4. The OSD shows �OK!�.
7. Pre white balance (II) ; (B-Y) 1) Camera �E-E�, 3100°K gray-scale chart. 2) Video(output) jack and AF MICOM. 4) Connect vectorscope input jack to video(output) jack. 3) Press the �BLC (MODE UP)/FADE(MODE DOWN)� button so that the OSD state is �274. XX XX(High)��275. XX XX(Low)�. 5) Aim the camera at a 3100°K gray-scale chart illuminated at 1500 to 2000 lx. 6) Adjust the �P.AE(DATA UP) /DSE(DATA DOWN)� button so that the white vector moves to the B-Y axial on screen of the vectorscope. Note : Bright dot shifts after the confirm button is pressed.
Match the white luminance point with the black luminance point
Match the white luminance point with the black luminance point
Match the white luminance point with the black luminance point
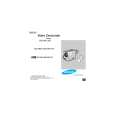
8. R-Y Gain 1) Camera �E-E�, 3100°K color bar chart. 2) Video(output) jack and register of EEPROM. 3) Connect video(output) jack to waveform monitor input jack and monitor TV jack respectively. 4) Press the �BLC(MODE UP)/FADE(MODE DOWN)� button so that the OSD state is �280. XX XX(High)��281. XX XX(Low)�. 5) Aim the camera at a color bar chart illuminated at 1500 to 2000 lx. 6) Adjust the �P.AE(DATA UP)/DSE(DATA DOWN)� button so that the red level is NTSC : 70IRE, PAL : 500mV 7) Be sure to press the �ENTER(CONFIRM)� button to memorize setting. Note : Bright dot shifts after the confirm button is pressed. (outdoor : 034, 035)
6. Pre white balance (I) ; (R-Y) 1) Camera �E-E�, 3100°K gray-scale chart. 2) Video(output) jack and AF MICOM. 3) Connect vectorscope input jack to video(output) jack. 4) Press the �BLC(MODE UP)/FADE(MODE DOWN)� button so that pass through 272, 273, 274, 275 and then the OSD state is �272. XX XX(High)��273. XX XX(Low)�. 5) Aim the camera at a 3100°K gray-scale chart illuminated at 1500 to 2000 lx. 6) Adjust the � P.AE(DATA UP)/DSE(DATA DOWN)� button so that the white vector moves to the R-Y axial on screen of the vectorscope. Note : Bright dot shifts after the confirm button is pressed.
70 IRE (NTSC) 500mV (PAL)
Samsung Electronics
4-33
|
|
|
> |
|